Edting text in SiteManager

Introduction. This article explains how to...

 Instructions

  1. Go to the webpage you want to edit and hit ESC to get into editing mode.

  2. Click on the Add Content to Main Content button and select the Text module.

  3. Click on the module to edit the module and display the Editing Tools.

  4. Click Save on the Editing Tools when done.

 Text does not automatically save so save often to prevent work from being lost!

The Editing Tools

SiteManager provides a full set of tools to simplify the process of editing your pages.  Please be aware that although it looks like a toolbar you would find in Microsoft Word, editing a web page differs from editing a Word document.  For example, if you hit "enter" when editing a web page, you will automatically get double spacing, also known as a paragraph break. To get single spacing you have to hit "shift"+"enter", also known as a line break.
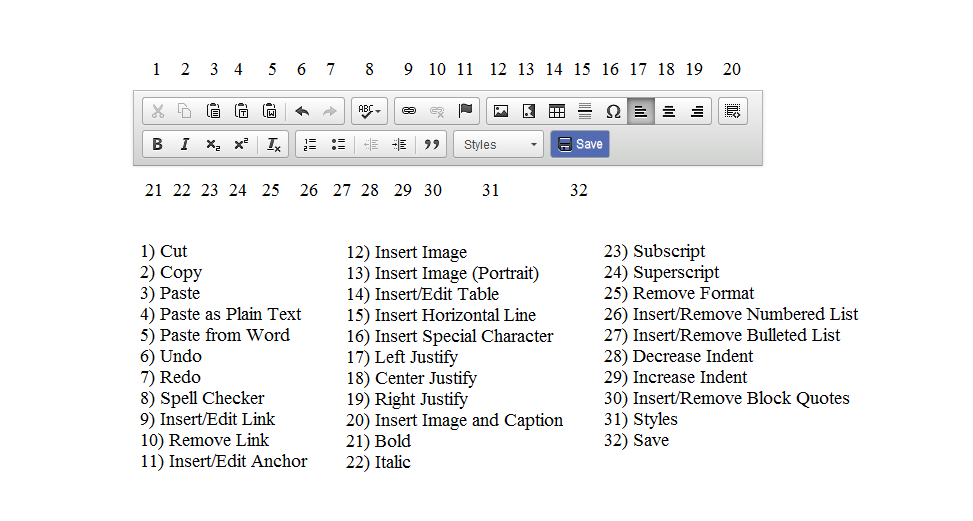
The Edit Toolbar

Labels each of the Edit buttons on the toolbar

Insert/Edit URL Link

  1.  Highlight the text or image you want to become a link.

  2. Click on the Insert/Edit Link button on the toolbar (#9).

  3. Under Link Type, select URL.

  4. Either type or paste a link in the URL box or click on Browse Server.

Link box

  1. Browse the server to link to the appropriate page.

    • Use the preview icon to see a preview of the page.

    • Use the link icon to insert the page's URL into the URL box.

Link Browser showcasing preview of inserted links

  1. To have the link open in a new browser window, click on the Target tab and from the drop down menu below Target, select New Window (_blank).

  1. Click on OK.

Insert/Edit Email Link

  1. Highlight the text you want to become a link.

  2. Click on the Insert/Edit Link button on the toolbar.

  3. Under Link Type, select Email.

  4. Type in the Email address and if desired, you can also type in the Message Subject and Message Body so that when a visitor clicks on an email link, a portion of the email message is created for them.

Email Link box

  1. Click on OK.

Remove a Link

  1. Highlight the text currently formatted as a link.

  2. Click on the Remove Link button on the toolbar (#10). 

Insert/Edit Anchor

Anchors are used on a page to quickly take a visitor to a specific section of the page.

  1. Place the cursor at the beginning of the line where you want the anchor to be.

  2. Click on the Insert/Edit Anchor button on the toolbar (#11).

  3. Enter the name of the anchor in the Anchor Properties window that appears.

Anchor Properties box

  1. To use the anchor as a link, click on the Insert/Edit Link  button (#9).

  2. Under Link Type, select Link to anchor in the text.

  3. Select an anchor name from the drop down list titled By Anchor Name.

Insert/Edit Link box

  1. Click on OK.

Insert Image

There are two ways to add images:

  • In their own Content module: 

    1. Click on the Add Content to Main Content button and select the Image module.

    2. Mouse over the module and click on Edit.

    3. Click on Select Image and search for or upload your image. 

    4. Add a name; describe the image in this field for users of assistive devices.

      • NOTE: This is also the required alt text field.

    5. Add a caption (should be short and informative).

    6. You can add a link to another page that the viewer will be redirected to if they click on the image (if applicable). 

    7. Select the Full Size option if you want the full image to open in a pop-up when clicked on. 

    8. Click on Save.


This image depicts the sitemanager popup that allows you to imbed an image into your college page.

  • Within a Text module (e.g. if you want your text to flow around an image):

    1. Click on one of the Image buttons on the toolbar within the text editor and search for or upload your images.

      • If you are inserting an image in landscape, choose the first 

        If you are inserting an image in portrait, choose the second Image button.

      • Instructions on adding new media to the Web Media Library.

      • The image can only be right-justified and you cannot edit the image using SiteManager. 

  1. Click Save


This image depicts an example of what it would look like to embed an image with sitemanager

Insert/Edit Table

Use tables when you need to present information that lends itself to a tabular setup.

  1. Place the cursor at the point you need the table to appear.

  2. Click on the Insert/Edit Table button on the toolbar.

Table Properties box

  1. Width: Measured either in pixels (200 pixels is the default) or as a percent of the module area you are in.  The width of Hamilton pages is 960 pixels.

  2. Height:  Measured in pixels (can be left empty).

  3. Cell Spacing: sets the amount of space between adjacent layout cells (in pixels).  This value should be less than 5.

  4. Cell padding: sets the amount of space between the content of a layout cell and the cell boundary (in pixels).  This value should be less than 5.

  5. Headers:  bolds the first row, first column, or both.

  6. Border size: specifies the width, in pixels, of the table’s borders.  A border size of zero will produce a borderless table, but you will see gridlines when editing your table.

  7. Alignment:  sets the alignment of the whole table.  Since the default size of the table is 100%, the Center and Right choices will appear to have no effect.

  8. Click on OK.

  9. Once your table is in place, you can right click in a cell or on the table to see the menu of options you can use to edit your table


 More information

Print Article

Related Articles (19)

This article explains how to navigate in the SiteManager interface.
This article explains how to add an accordion item into the Hamilton College page you are editing.
This article explains how to add, display, and create new article databases.
This article explains how to begin editing a page on the Hamilton college site.
This article explains how to embed Google Calendar events on your Hamilton College webpage.
This article explains how to add an important date to the Hamilton College page you are editing.
This article explains how to setup and add a navigation module to a page.
This article explains how to add the office hour module to the Hamilton College page you are editing.
This article explains how to add a page title to a Hamilton College page while editing.
This article explains how to add a person profile onto the Hamilton College page you are editing.
This article explains how to use the photo grid module when editing a Hamilton College page.
This article provides a general overview of metadata and keyword fields, enabling users to easily find your article through keyword searches.
This article explains how to add site contact information on a Hamilton College page.
This article explains how to add a staff directory to the Hamilton College page you are editing.
This article explains how to add a video to your editing Hamilton College site.
This article provides information on how to add videos to content using Sitemanager.
This article explains how to add a module that allows you to list upcoming events and notices on the Hamilton College page you are editing.
This article explains SiteManager 4.5, used for updating website content at Hamilton.
This article provides information on web publishing at Hamilton.

Related Services / Offerings (1)

This document outlines the process for obtaining editing privileges for Hamilton webpages.